Load Testing OpenAI vLLM with OpenText Performance Engineering Solutions
Original published: https://community.opentext.com/devops-cloud/b/devops-blog/posts/load-testing-openai-vllm-with-opentext-performance-engineering-solutions
OpenText Performance Engineering solutions have long been recognized as industry-leading performance testing tools, trusted for their robust support of diverse protocols and their ability to deliver scalable, fully integrated testing solutions. With the release of CE 25.1, we are excited to introduce an enhancement to the WEB - HTTP/HTML protocol: the addition of the ResponseTime attribute to the web_custom_request function. This powerful new feature empowers users to evaluate their load tests using a fresh performance metric. Beyond traditional use cases, this metric opens up exciting opportunities, including performance testing for Large Language Model (LLM) engines, marking a significant step forward in OpenText Performance Engineering solutions’ evolution.
Let’s explore how to perform a load test for an LLM using this new feature. Below is an example with OpenAI. The same method and script are compatible with vLLM, as it can be deployed as a server implementing the OpenAI API protocol.
The working modes of models are typically divided into Non-Streaming and Streaming. In a Non-Streaming conversation, OpenAI responds to a prompt with a single JSON body containing the complete response at once. While this simplifies output handling, it may result in a longer wait time. In contrast, Streaming delivers the response incrementally in chunks, enabling clients to process or display parts of the response as they are received, improving interactivity and reducing perceived latency.
Testing with Non-Streaming Mode
Here’s an example of interacting with OpenAI’s API in Non-Streaming mode:
Request:
POST https://api.openai.com/v1/chat/completions
Content-Type: application/json
Authorization: Bearer $OPENAI_API_KEY

{
  "model": "gpt-4o",
  "messages": [
    {
      "role": "developer",
      "content": "You are a helpful assistant."
    },
    {
      "role": "user",
      "content": "Hello!"
    }
  ]
}
Response:
{
  "id": "chatcmpl-123",
  "object": "chat.completion",
  "created": 1677652288,
  "model": "gpt-4o-mini",
  "system_fingerprint": "fp_44709d6fcb",
  "choices": [{
    "index": 0,
    "message": {
      "role": "assistant",
      "content": "\n\nHello there, how may I assist you today?",
    },
    "logprobs": null,
    "finish_reason": "stop"
  }],
  "usage": {
    "prompt_tokens": 9,
    "completion_tokens": 12,
    "total_tokens": 21,
    "completion_tokens_details": {
      "reasoning_tokens": 0,
      "accepted_prediction_tokens": 0,
      "rejected_prediction_tokens": 0
    }
  }
}
Key fields to note:
completion_tokens: The number of tokens in the response.text: The content of the model’s response.
VuGen Script for Non-Streaming
Let’s now explore how to send a request and capture metrics using a VuGen script. To evaluate OpenAI’s Non-Streaming mode, use the web_custom_request function from the WEB - HTTP/HTML protocol to perform a POST request. The completion_tokens can be parsed from the response, and the model’s rate can be calculated by dividing the completion_tokens by the ResponseTime.
Script:
float calcSpeed(float token_count , float duration)
{
  float duration_secconds = duration / 1000;
  float speed = token_count / duration_secconds;
  return speed;
}

Action()
{
  char* s_model_response_time = NULL;
  char* s_token_count = NULL;
  int model_response_time = 0.0;
  int token_count = 0.0;
  float model_rate = 0.0;

  // Register to capture the "completion_tokens" from the response
  web_reg_save_param_json(
    "ParamName=completion_tokens",
    "QueryString=$..completion_tokens",
    "NotFound=warning",
    "SelectAll=Yes",
    SEARCH_FILTERS,
    "Scope=BODY",
    LAST);

  // Add necessary headers
  web_add_header("Content-Type","application/json");
  web_add_header("Authorization","<OPENAI-API-KEY>");

  // Perform the POST request
  web_custom_request("OpenAI_Chat_Completion",
    "URL=https://api.openai.com/v1/chat/completions",
    "Method=POST",
    "Body={\"model\": \"gpt-4o\", \"messages\": [{\"role\": \"assistant\", \"content\": \"You are a helpful assistant.\"}]}",
    "ResponseTime=openaiResponseTime",
    LAST);

  // Extract response time and token count
  s_model_response_time = lr_eval_string("{openaiResponseTime}");
  s_token_count = lr_eval_string("{completion_tokens_1}");
  model_response_time = atoi(s_model_response_time);
  token_count = atoi(s_token_count);

  // Calculate token processing rate (tokens per second)
  model_rate = calcSpeed(token_count, model_response_time);

  // Report metrics for analysis
  lr_user_data_point("gpt-4o Rate(token/s)", model_rate);
  return 0;
}
Calculating “Tokens per Second” During Non-Streaming Tests:
-
Send a POST Request & Capture Response Latency
The script sends a POST request to OpenAI usingweb_custom_request. The body of the request follows OpenAI’s API format, including the prompt and model instructions. The response time (latency) is captured usingResponseTime=openaiResponseTimeand saved for later use. -
Capture Tokens from the Response
Theweb_reg_save_param_jsonfunction registers a query to extract thecompletion_tokensfield from the server’s response body. This captures the number of tokens generated by the model and stores the value for use in subsequent calculations. -
Calculate & Report Tokens per Second
Once the response time and token count are extracted, the processing speed (tokens per second) is calculated by dividing the token count by the response time (converted to seconds). The result is reported using thelr_user_data_pointfunction asgpt-4o Rate(token/s), which will be displayed inControllerandAnalysisgraphs for further analysis.
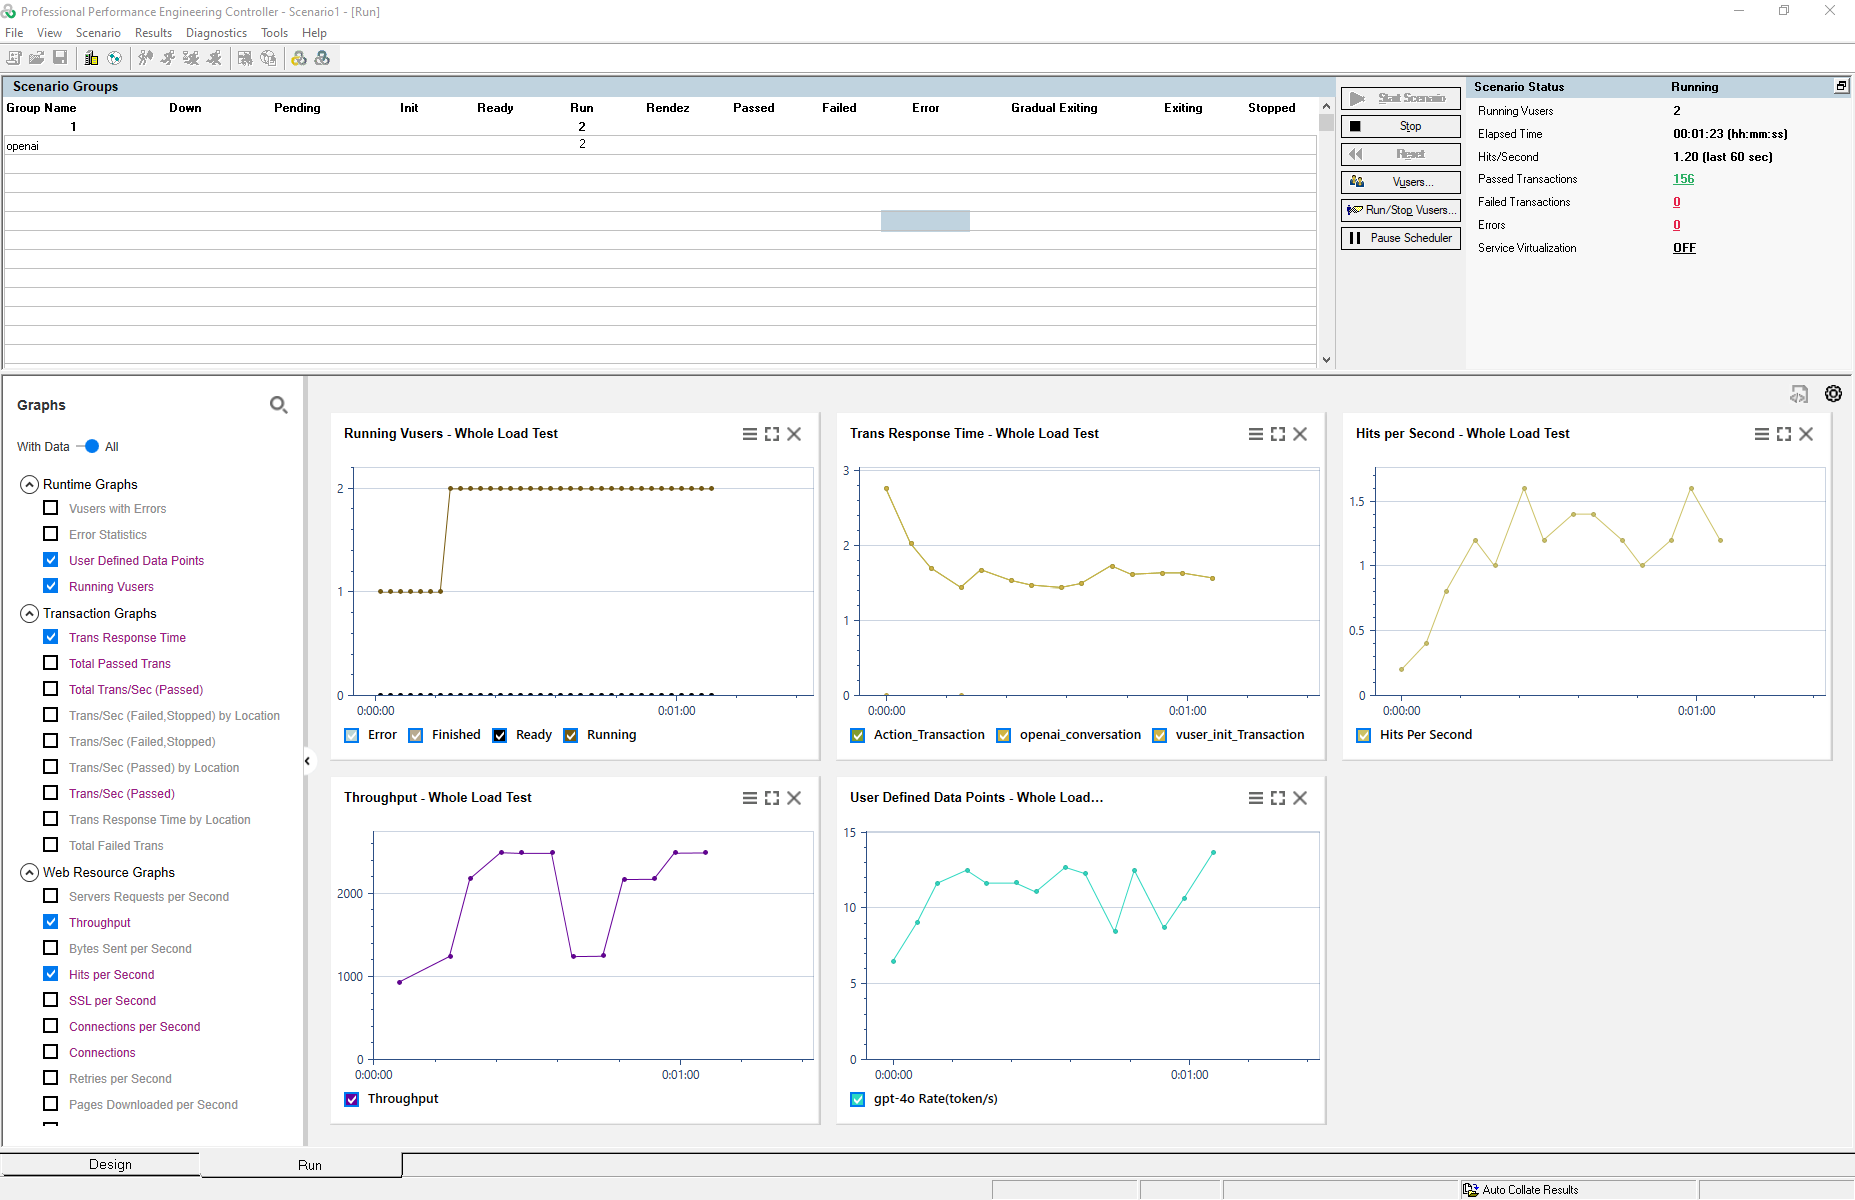
Running Load Test in Controller
Create and define a scenario in Controller to simulate the desired load. Configure the test parameters, including the number of virtual users and duration, to align with your testing goals. Start the test to begin collecting performance metrics.
The metrics, such as model response speed and token processing rate, will appear in the User Defined Data Points section of the Controller’s graphs, enabling you to monitor and analyze them in real-time.
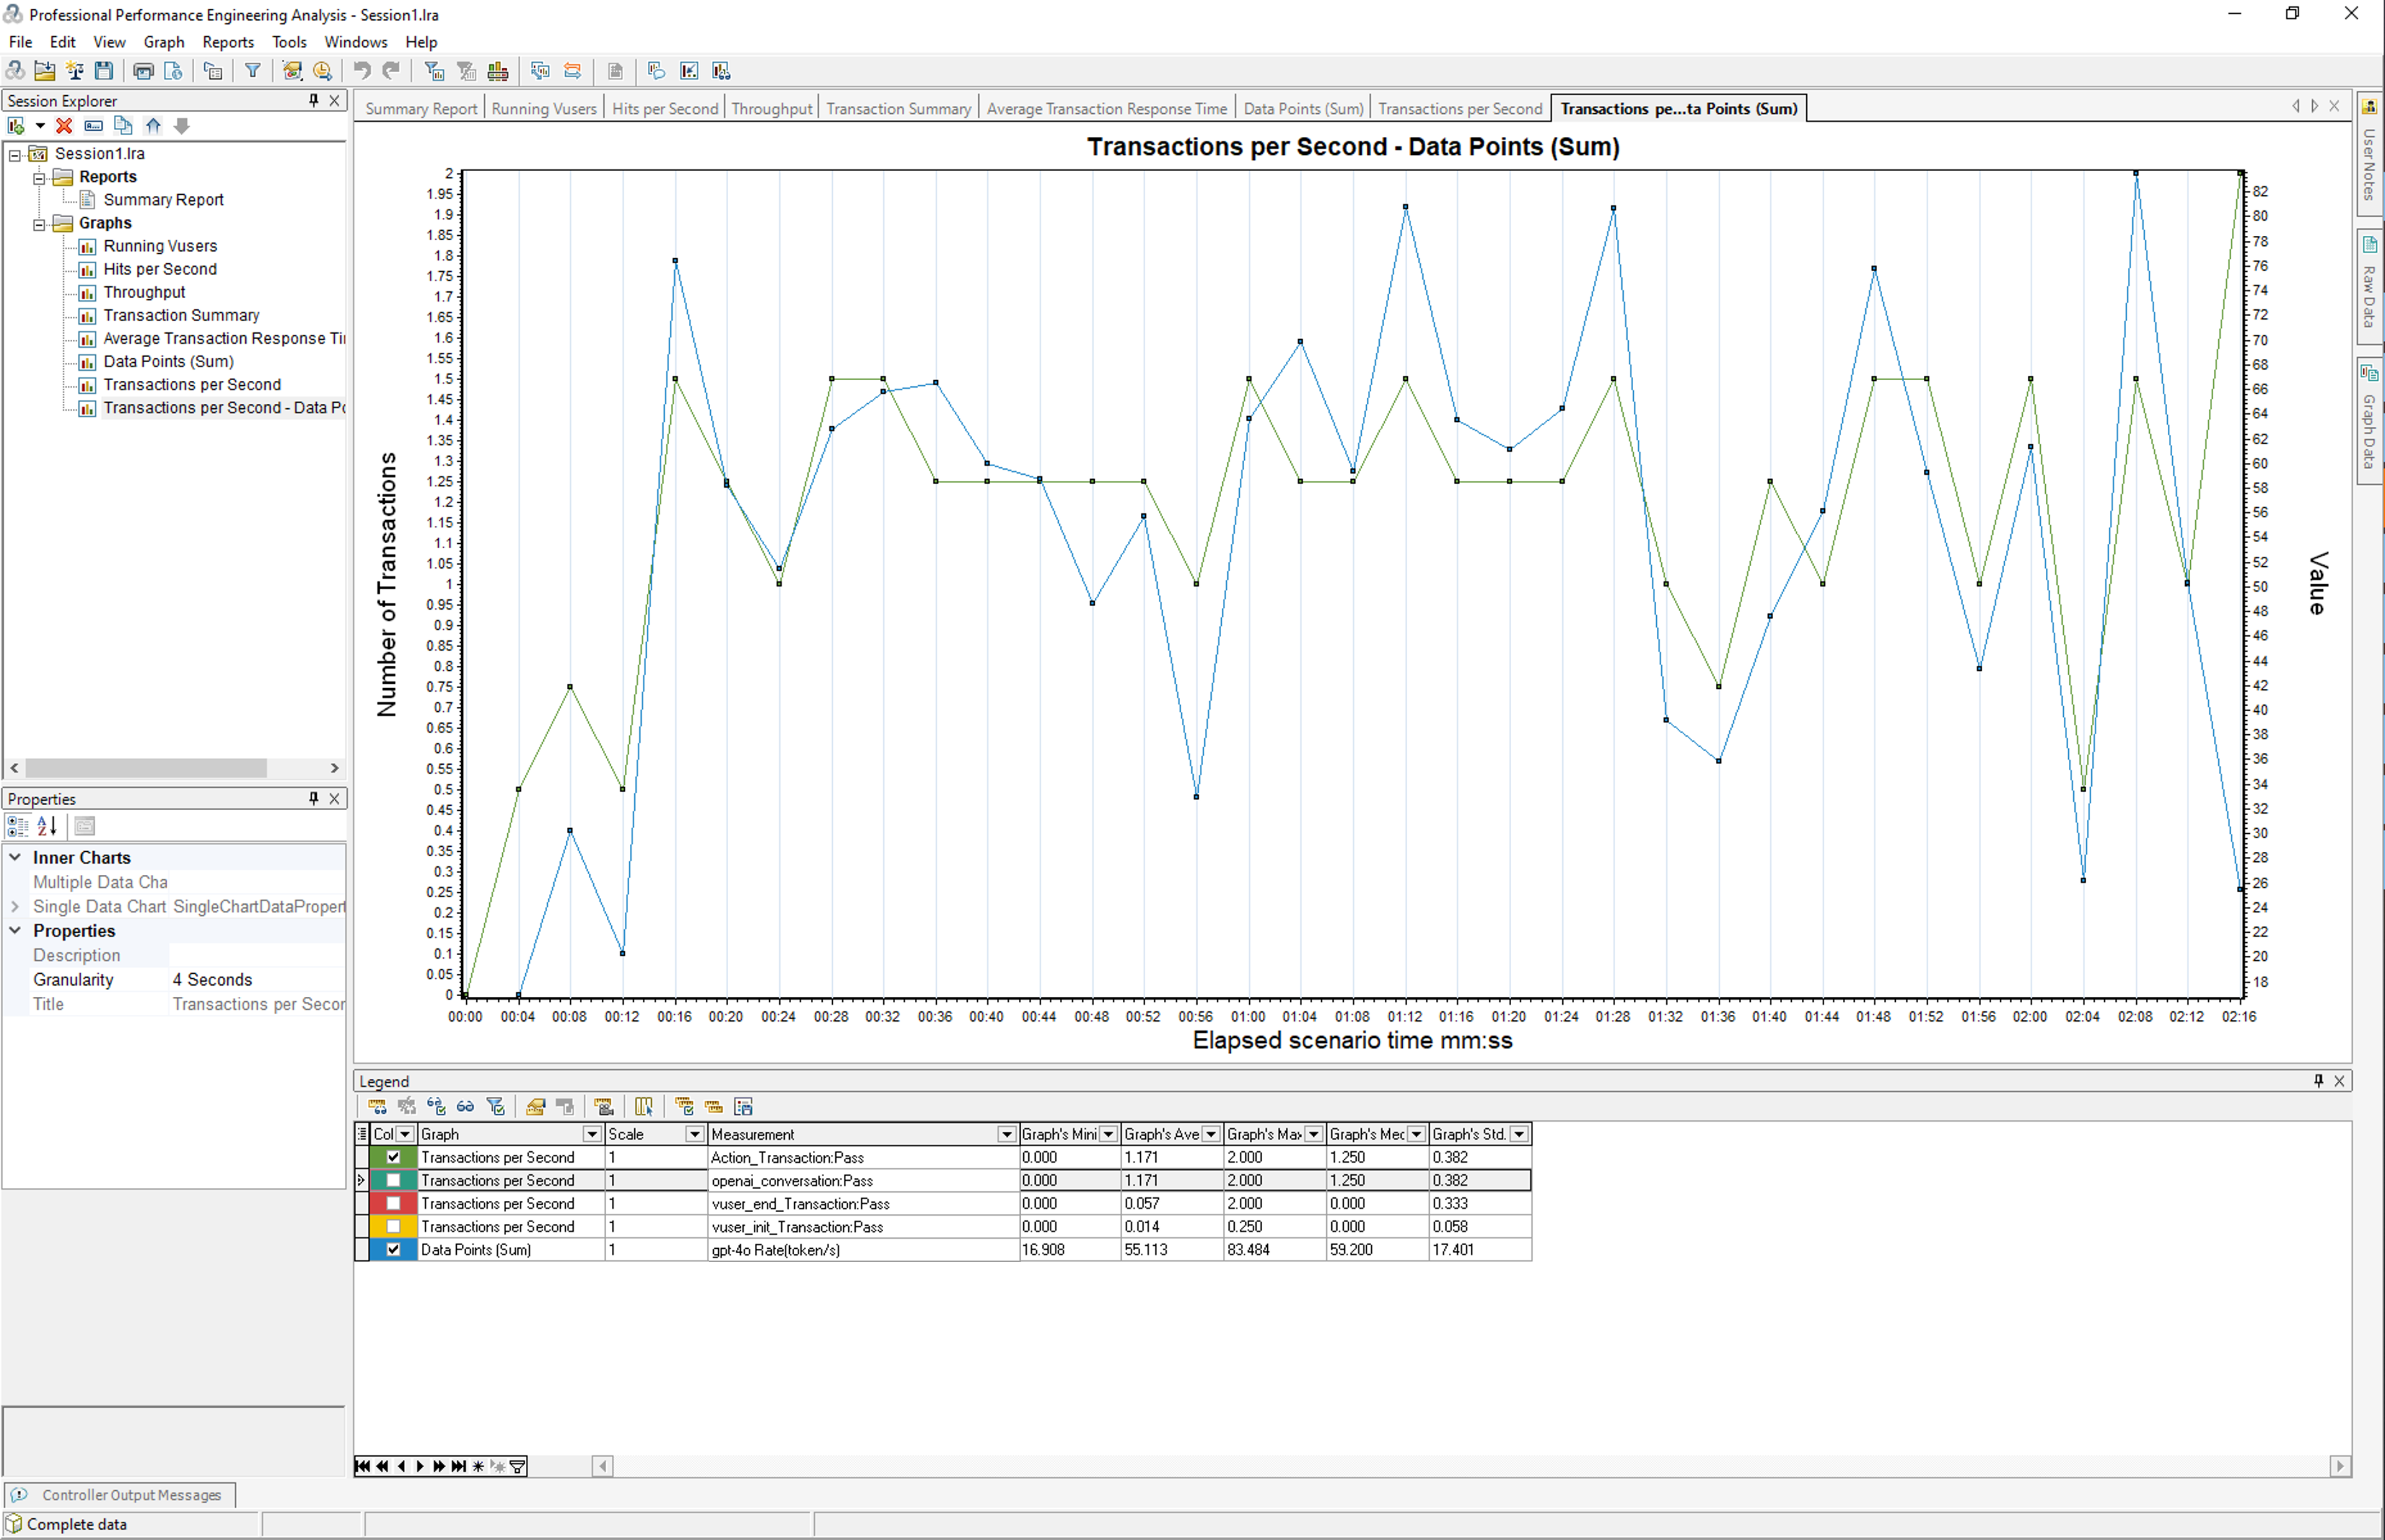
Analyzing Results in Analysis
To analyze the relationship between load and model performance, merge the transaction graph with the model speed graph. This will help visualize how the model’s rate changes under varying load conditions.
Testing with Streaming Mode
In streaming mode, unlike the non-streaming mode, the LLM returns responses incrementally as a stream after receiving a request. As described in the OpenAI reference, the OpenAI Streaming API follows the Server-sent events standard.
Here’s an example of interacting with OpenAI’s API in streaming mode:
Request:
POST https://api.openai.com/v1/chat/completions
Content-Type: application/json
Authorization: Bearer $OPENAI_API_KEY

{
  "model": "gpt-4o",
  "messages": [
    {
      "role": "developer",
      "content": "You are a helpful assistant."
    },
    {
      "role": "user",
      "content": "Hello!"
    }
  ],
  "stream": true
}
Response:
{"id":"chatcmpl-123","object":"chat.completion.chunk","created":1736233986,"model":"gpt-4o-2024-08-06","system_fingerprint":"fp_5f20662549","choices":[{"index":0,"delta":{"role":"assistant","content":"","refusal":null},"logprobs":null,"finish_reason":null}]}

{"id":"chatcmpl-123","object":"chat.completion.chunk","created":1736233986,"model":"gpt-4o-2024-08-06","system_fingerprint":"fp_5f20662549","choices":[{"index":0,"delta":{"content":"In"},"logprobs":null,"finish_reason":null}]}

{"id":"chatcmpl-123","object":"chat.completion.chunk","created":1736233986,"model":"gpt-4o-2024-08-06","system_fingerprint":"fp_5f20662549","choices":[{"index":0,"delta":{"content":" the"},"logprobs":null,"finish_reason":null}]}

...

{"id":"chatcmpl-123","object":"chat.completion.chunk","created":1736233986,"model":"gpt-4o-2024-08-06","system_fingerprint":"fp_5f20662549","choices":[{"index":0,"delta":{"content":" world"},"logprobs":null,"finish_reason":null}]}

{"id":"chatcmpl-123","object":"chat.completion.chunk","created":1736233986,"model":"gpt-4o-2024-08-06","system_fingerprint":"fp_5f20662549","choices":[{"index":0,"delta":{"content":"."},"logprobs":null,"finish_reason":null}]}

{"id":"chatcmpl-123","object":"chat.completion.chunk","created":1736233986,"model":"gpt-4o-2024-08-06","system_fingerprint":"fp_5f20662549","choices":[{"index":0,"delta":{},"logprobs":null,"finish_reason":"stop"}]}

[DONE]
VuGen Script for Streaming
To execute a load test with OpenAI’s API in streaming mode, you need to send requests and process the streaming response properly.
Fortunately, the asynchronous communication mechanism of the WEB - HTTP/HTML protocol seamlessly integrates with OpenAI’s streaming mode.
Using web_reg_async_attributes, you can register an asynchronous request and define callback functions to process stream data.
Register an Asynchronous Request:
web_reg_async_attributes("ID=Push_0",
    "URL=https://api.openai.com/v1/chat/completions",
    "Pattern=Push",
    "RequestCB=Push_0_RequestCB",
    "ResponseBodyBufferCB=Push_0_ResponseBodyBufferCB",
    "ResponseCB=Push_0_ResponseCB",
    LAST);

web_custom_request("OpenAI_Chat_Completion",
    "URL=https://api.openai.com/v1/chat/completions",
    "Method=POST",
    "Body={\"model\": \"gpt-4o\", \"messages\": [{\"role\": \"developer\", \"content\": \"You are a helpful assistant.\"}, { \"role\": \"user\", \"content\": \"Please write a short story about trees!\"}], \"stream\": true}",
    "ResponseTime=openaiResponseTime",
    LAST);
- Callback Functions:
Push_0_ResponseBodyBufferCB: Invoked after each response chunk is received, enabling granular latency and token count tracking.Push_0_ResponseCB: Invoked at the end of the conversation.
- Request to OpenAI Streaming API:
stream: truemust be specified in request body.openaiResponseTime: Saves and updates the response time after each response.
In the callback function, you can capture metrics like response latency and token-level performance by parsing the streaming response content returned by the LLM and calculating latency between the chunks. This granular tracking is essential for analyzing the model’s real-time performance during load tests.
Callback Functions:
int count_content_fields(const char *str) {
    int count = 0;
    const char *target = "content";
    int target_len = 7;  // Length of "content"

    while (*str) {
        int i = 0;
        while (str[i] && target[i] && str[i] == target[i]) {
            i++;
        }

        if (i == target_len) {
            count++;
            str += target_len;
        } else {
            str++;
        }
    }
    return count;
}

int lastResponseTime = 0;
int responseIndex = 0;

int Push_0_ResponseBodyBufferCB(
  const char *  aLastBufferStr,
  int           aLastBufferLen,
  const char *  aAccumulatedStr,
  int           aHttpStatusCode)
{
  char* s_model_response_time = NULL;
  int model_response_time = 0.0;
  int token_count = 0.0;
  int latency = 0;

  s_model_response_time = lr_eval_string("{openaiResponseTime}");
  model_response_time = atoi(s_model_response_time);
  latency = model_response_time - lastResponseTime;
  lastResponseTime = model_response_time;

  if (responseIndex == 0)
  {
    lr_user_data_point("first token latency(ms)", latency);
  }
  else if(responseIndex > 0)
  {
    token_count = count_content_fields(aLastBufferStr);
    lr_output_message("%i tokens received", token_count);
    if (token_count > 0)
    {
      lr_user_data_point("per token latency(ms)", latency / token_count);
    }
  }
  ++responseIndex;
  return WEB_ASYNC_CB_RC_OK;
}

int Push_0_ResponseCB(
  const char *  aResponseHeadersStr,
  int           aResponseHeadersLen,
  const char *  aResponseBodyStr,
  int           aResponseBodyLen,
  int           aHttpStatusCode)
{
  lr_save_string("OK","ready");
  lastResponseTime = 0;
  responseIndex = 0;
  return WEB_ASYNC_CB_RC_OK;
}
Capturing Key Metrics in Callback Functions
First Token Latency (ms):
The first token latency is the time taken from when the request is sent to when the first response chunk (token) is received.
- Initial Setup:
- Initialize a global variable
lastResponseTimeto track the timestamp of the most recent response. - Initialize
responseIndexto distinguish the first response from subsequent responses.
- Initialize a global variable
- Response Timing:
- In the
Push_0_ResponseBodyBufferCBcallback, retrieve the current response time usinglr_eval_string("{openaiResponseTime}"). - Convert this value to an integer (
model_response_time).
- In the
- Latency Calculation:
- Calculate the latency for the first token as the difference between the current response time and the
lastResponseTime. SincelastResponseTimeis initially 0, the result is simply the current response time.
- Calculate the latency for the first token as the difference between the current response time and the
- Metric Reporting:
- If
responseIndex == 0, record the calculated latency usinglr_user_data_point("First Token Latency (ms)", latency).
- If
- Update State:
- Update
lastResponseTimewith the current response time. - Increment
responseIndexto track subsequent tokens.
- Update
Per Token Latency (ms):
The per token latency measures the average time between receiving consecutive response tokens.
- Token Counting:
- Use the
count_content_fieldsfunction to count occurrences of thecontentfield in the current response chunk. Each occurrence represents one token.
- Use the
- Latency Calculation:
- Calculate the time difference between the current response and the last response (
latency = model_response_time - lastResponseTime).
- Calculate the time difference between the current response and the last response (
- Average Per Token Latency:
- Divide the latency by the number of tokens received in the current chunk (
latency / token_count).
- Divide the latency by the number of tokens received in the current chunk (
- Metric Reporting:
- If tokens are detected in the current chunk (
token_count > 0), report the average latency for the tokens using:lr_user_data_point("Per Token Latency (ms)", latency / token_count);
- If tokens are detected in the current chunk (
- Update State:
- Update
lastResponseTimewith the current response time. - Increment
responseIndex.
- Update
Reset lastResponseTime and responseIndex to 0 at the end of conversation in Push_0_ResponseCB.
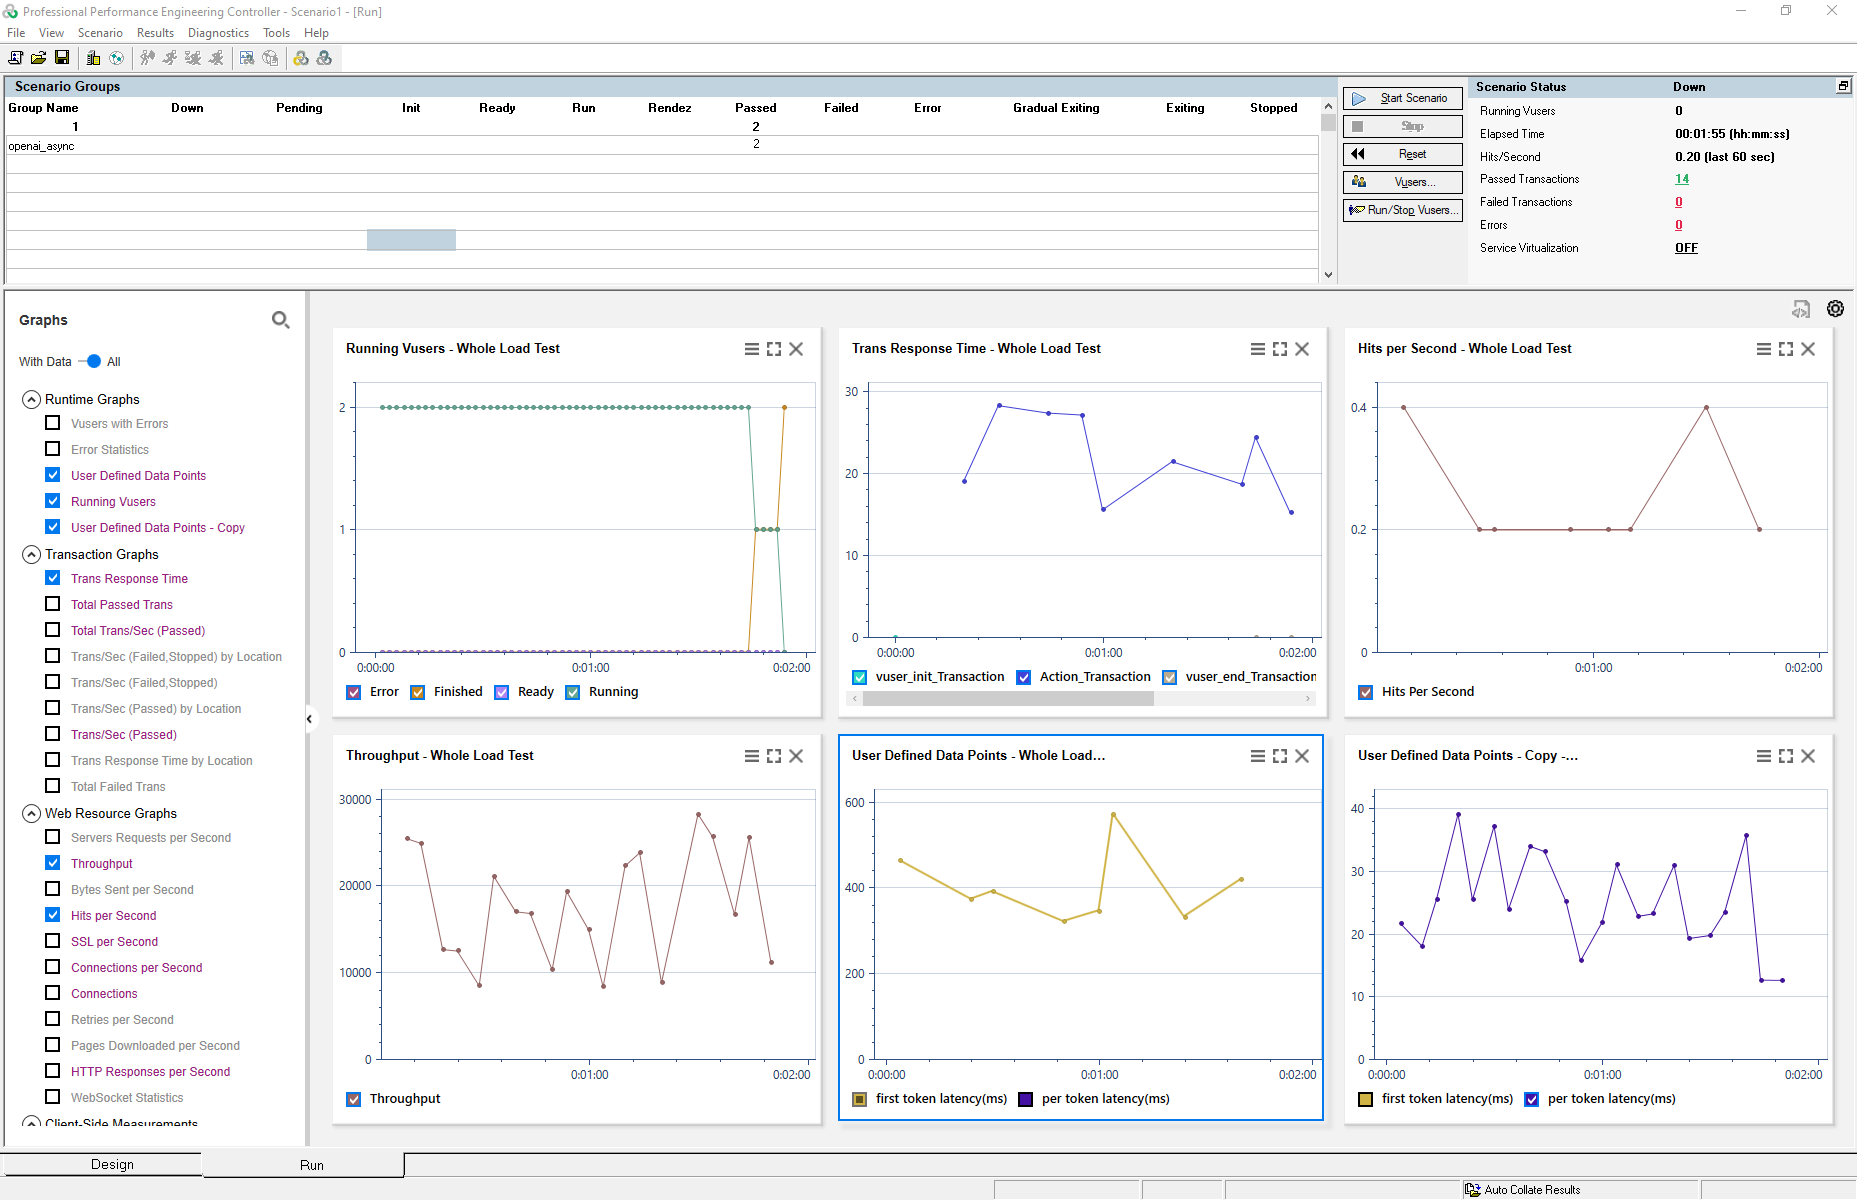
Replay Script and Analyze Results
Similar to the process in Non-Streaming mode, define a scenario in the Controller that includes the OpenAI Streaming test script. Configure the load conditions to simulate real-world usage patterns.
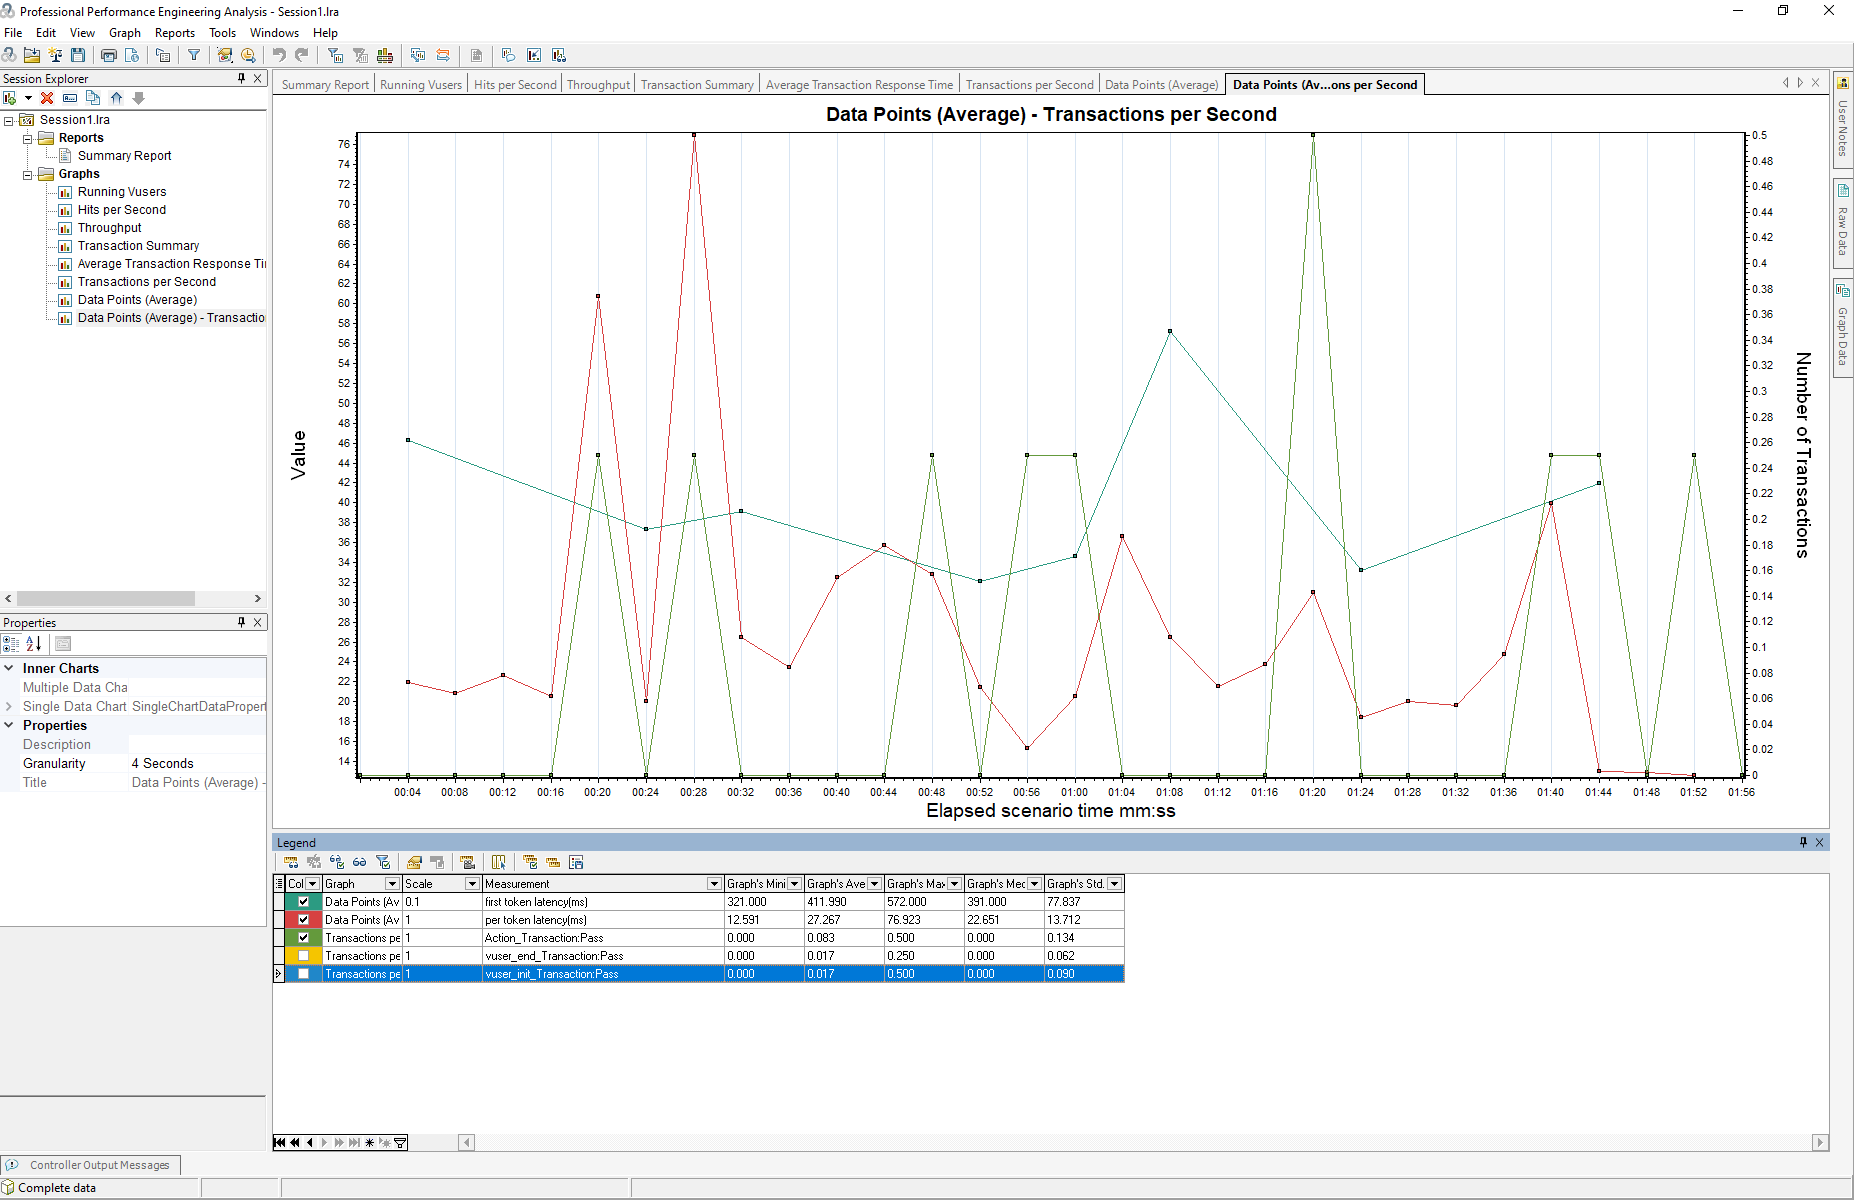
Once the test is executed, use the Analysis tool to evaluate the relationship between the applied load and the model’s performance metrics, such as first token latency (ms) and per token latency (ms).
Focus on identifying trends, bottlenecks, and potential optimizations for streaming efficiency under varying load levels.
Running Load Test in Controller:
Analyzing Results in Analysis:
Using Parameters and VTS to Enhance Load Testing
When performing a loading test, you may want to send a different prompt to the model in each round of access, making the test more realistic. Parameterization and Virtual Table Server (VTS) can help you achieve this effectively.
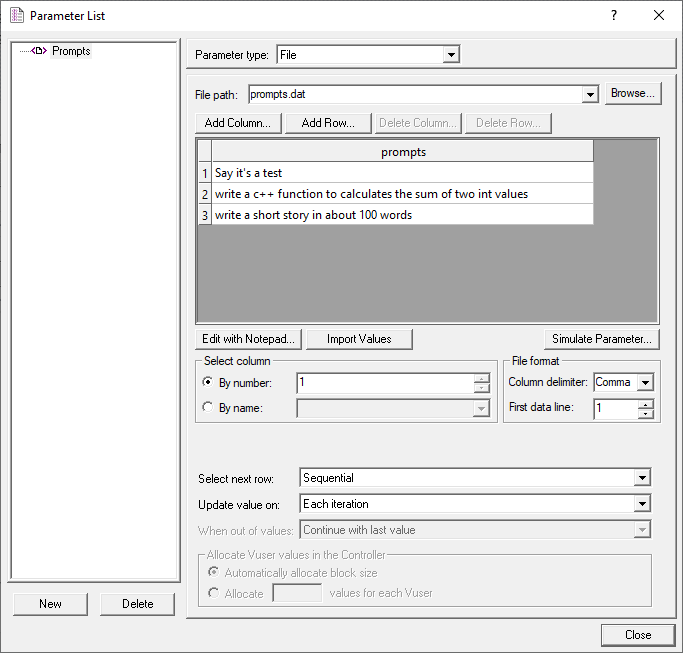
Parameterized Prompts
Define a list of prompts in Parameters:
Say it's a test
Write a C++ function to calculate the sum of two int values
Write a short story in about 100 words
Include prompts in your script:
lr_param_sprintf("request_body", "Body={\"model\": \"gpt-4o-mini\", \"messages\": [{\"role\": \"user\", \"content\": \"%s\"}]}", lr_eval_string("{Prompts}"));

web_custom_request("OpenAI_Chat_Completion",
    "URL=https://api.openai.com/v1/chat/completions",
    "Method=POST",
    lr_eval_string("{request_body}"),
    "ResponseTime=openaiResponseTime",
    LAST);
The prompts in the Prompts list will be included in the request_body, making each request to OpenAI unique in every iteration.
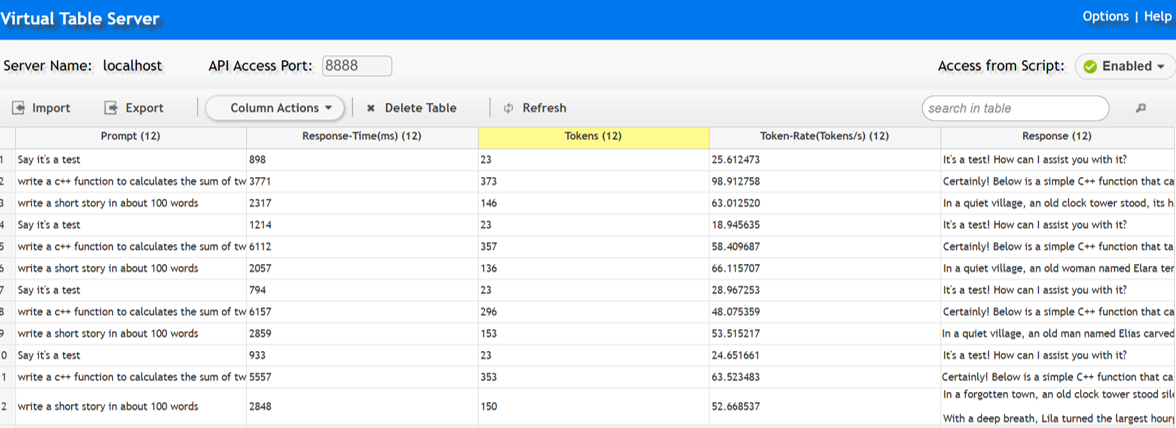
Collect Prompts and Responses in VTS
You can log the prompt, response content, response time, token count, and processing rate using the VTS API in your script. This creates a comprehensive table that allows you to track and analyze test information conveniently.
Code Example:
...

lrvtc_create_column("Prompt");
lrvtc_create_column("Response");
lrvtc_create_column("Response-Time(ms)");
lrvtc_create_column("Tokens");
lrvtc_create_column("Token-Rate(Tokens/s)");

lrvtc_send_row1("Prompt;Response-Time(ms);Tokens;Token-Rate(Tokens/s)",
"{Prompts};{openaiResponseTime};{completion_tokens_1};{token_rate}", ";", VTSEND_STACKED);

lrvtc_send_message("Response", "{content_1}");
...
VTS Page